플레이어로 부터 입력을 받기 위해 언리얼 엔진의 입력 환경설정을 해주어야 합니다.
입력 매핑에는 액션 매핑과 축 매핑 두가지 종류가 존재합니다.
- 액션 매핑 : 플레이어의 단일적인 입력을 감지합니다. 키를 누르거나, 눌렀다 떼거나, 더블클릭하거나, 누르고 있거나 할 때의 입력을 감지한다고 생각하시면 됩니다. 점프, 슈팅, 오브젝트 상호작용 등 별도의 동작이 액션 매핑 유형에 좋은 후보가 됩니다.
- 축 매핑 : 플레이어의 연속적인 입력을 감지합니다. 플레이어가 움직이지 않더라도 매 프레임마다 그 값을 감지합니다. 걷기나 화면의 회전처럼 세기나 방향이 있는 것들을 처리하는데 축 매핑이 주로 사용됩니다.
1. 액션 매핑 입력 설정
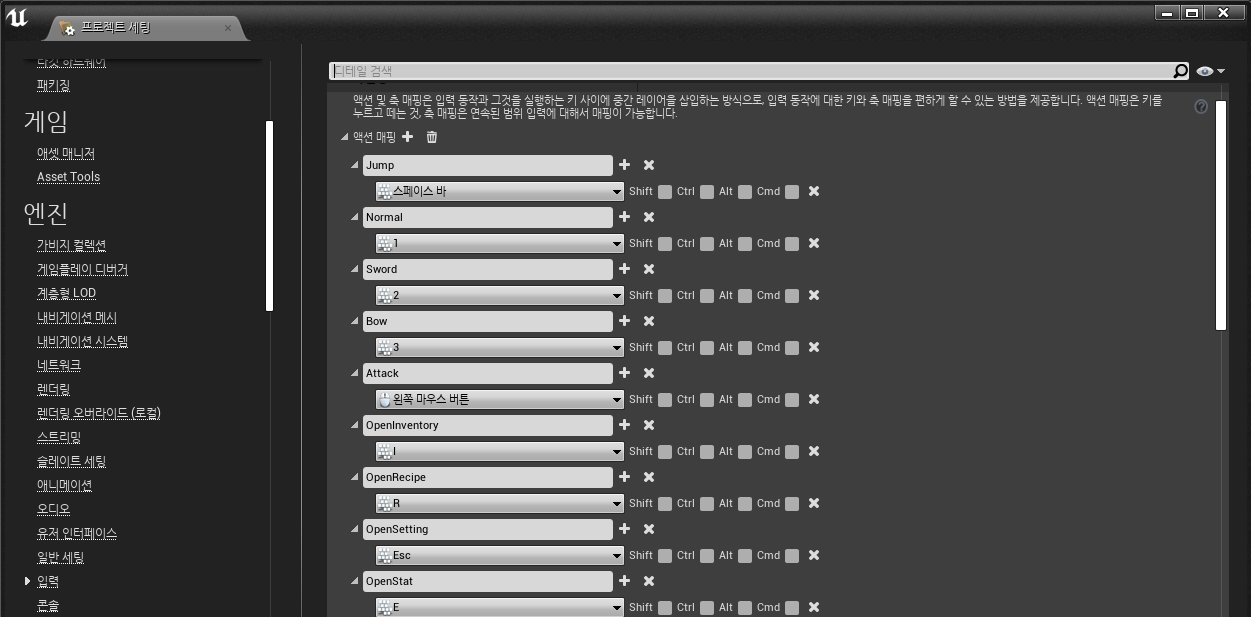
프로젝트 세팅 옵션을 들어가서 왼쪽의 엔진 탭의 입력 옵션을 선택합니다.
그런 다음 액션 매핑 섹션에서 제목줄 옆의 + 부호를 클릭해서 새 매핑을 추가합니다. 액션 매핑은 위에서 설명드렸듯이 단일적인 입력을 감지하는데 사용되기 때문에 점프, 플레이어 상태 변경 버튼, 인벤토리 등 게임 UI를 노출시키는 버튼들을 액션 매핑에 추가해 주었습니다.
2. 축 매핑 입력 설정
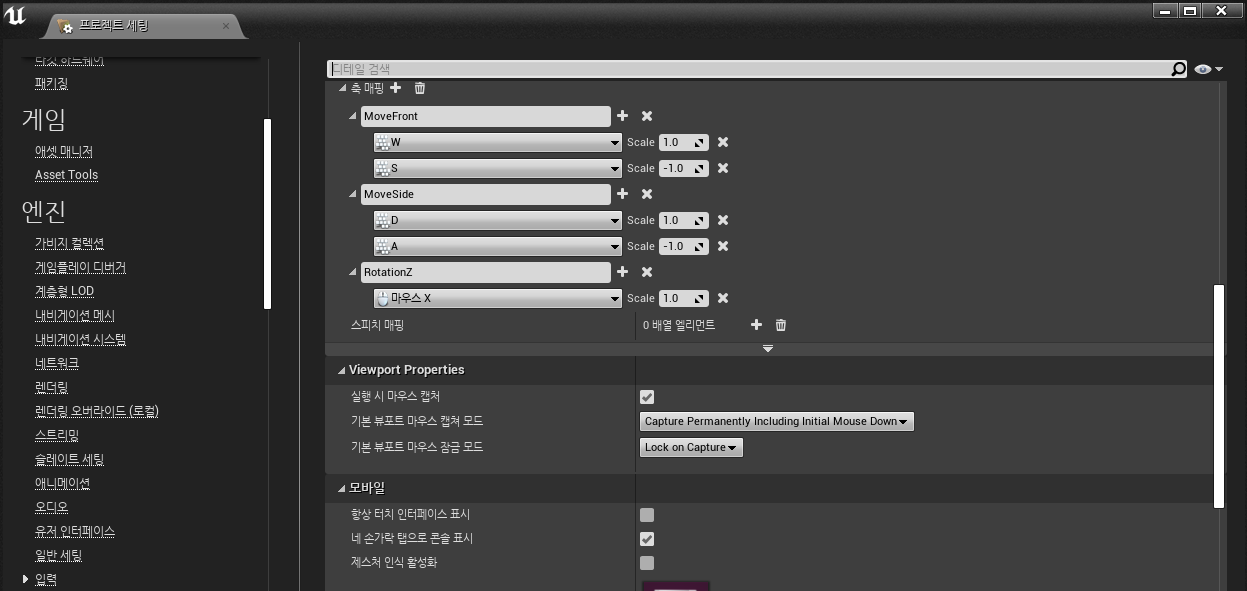
축 매핑 또한 액션 매핑과 마찬가지로 엔진 탭의 입력 옵션에 들어와서 제목줄 옆의 + 부호를 클릭해서 새 매핑을 추가합니다. 축 매핑은 연속적인 입력을 감지하는데 사용되기 때문에 플레이어의 상하좌우 움직임과 마우스를 사용한 화면 회전을 축 매핑에 추가해 주었습니다. 여기서 눈여겨 볼 부분은 "S"와 "A"의 입력에 음수값을 넣어준 것입니다. 그 이유는 코드를 보여드리면서 설명드리겠습니다.
3. 활용 예제
private:
	// 축 매핑 입력에 바인딩할 함수들
	void MoveFront(float fScale);
	void MoveSide(float fScale);
	void RotationZ(float fScale);

	// 액션 매핑 입력에 바인딩할 함수들
	void JumpKey();
	void Attack();
	void NormalSwitch();
	void SwordSwitch();
	void BowSwitch();
	void OpenInventory();
	void OpenRecipe();
	void OpenSetting();
	void OpenStat();
우선 헤더 파일에서 플레이어의 키입력을 받았을때 실행될 함수들을 선언해줍니다.
void AMyPawn::SetupPlayerInputComponent(UInputComponent* PlayerInputComponent)
{
	Super::SetupPlayerInputComponent(PlayerInputComponent);

	// 축 매핑 입력에 함수 바인딩
	PlayerInputComponent->BindAxis(TEXT("MoveSide"), this, &APlayerSurvivor::MoveSide);
	PlayerInputComponent->BindAxis(TEXT("MoveFront"), this, &APlayerSurvivor::MoveFront);
	PlayerInputComponent->BindAxis(TEXT("RotationZ"), this, &APlayerSurvivor::RotationZ);

	// 액션 매핑 입력에 함수 바인딩
	PlayerInputComponent->BindAction(TEXT("Jump"), EInputEvent::IE_Pressed, this, &APlayerSurvivor::JumpKey);
	PlayerInputComponent->BindAction(TEXT("Normal"), EInputEvent::IE_Pressed, this, &APlayerSurvivor::NormalSwitch);
	PlayerInputComponent->BindAction(TEXT("Sword"), EInputEvent::IE_Pressed, this, &APlayerSurvivor::SwordSwitch);
	PlayerInputComponent->BindAction(TEXT("Bow"), EInputEvent::IE_Pressed, this, &APlayerSurvivor::BowSwitch);
	PlayerInputComponent->BindAction(TEXT("Attack"), EInputEvent::IE_Pressed, this, &APlayerSurvivor::Attack);
	PlayerInputComponent->BindAction(TEXT("OpenInventory"), EInputEvent::IE_Pressed, this, &APlayerSurvivor::OpenInventory);
	PlayerInputComponent->BindAction(TEXT("OpenRecipe"), EInputEvent::IE_Pressed, this, &APlayerSurvivor::OpenRecipe);
	PlayerInputComponent->BindAction(TEXT("OpenSetting"), EInputEvent::IE_Pressed, this, &APlayerSurvivor::OpenSetting);
	PlayerInputComponent->BindAction(TEXT("OpenStat"), EInputEvent::IE_Pressed, this, &APlayerSurvivor::OpenStat);
}
그리고 나서 SetupPlayerInputComponent 함수에서 해당 함수들을 바인딩해줍니다.
이렇게 바인딩해주면 플레이어의 키입력을 받았을때 바인딩해준 함수가 호출되게 됩니다.
void AMyPawn::MoveFront(float fScale)
{
    // 초당 100 유닛을 앞 또는 뒤로 움직입니다
    CurrentVelocity.X = FMath::Clamp(fScale, -1.0f, 1.0f) * 100.0f;
}

void AMyPawn::MoveSide(float fScale)
{
    // 초당 100 유닛을 오른쪽 또는 왼쪽으로 움직입니다
    CurrentVelocity.Y = FMath::Clamp(fScale, -1.0f, 1.0f) * 100.0f;
}

void AMyPawn::RotationZ(float fScale)
{
	// 화면 회전
	AddControllerYawInput(fScale);
}

void AMyPawn::JumpKey()
{
	// 점프를 실행하는 함수
	Jump();
}
플레이어가 "W"나 "S" 입력을 하면 MoveFront 함수가 호출되고, "D"나 "A" 입력을 하면 MoveSide 함수가 호출되게 됩니다. 위에서 "S"와 "A"에 음수값을 넣어준 이유가 바로 이것 때문이었습니다. "S"와 "A" 입력시에는 액터를 정방향과는 반대 방향으로 이동시켜야 하기 때문입니다.
이렇게 액션 매핑과 축 매핑을 사용하여 다양한 상호작용을 구현할 수 있습니다.
'언리얼 C++ 프로그래밍' 카테고리의 다른 글
| [언리얼 C++] UMG와 UI - 위젯 인터렉션 C++로 제작하기 (0) | 2021.06.27 |
|---|---|
| [언리얼 C++] UMG와 UI - Viewport에 위젯 띄우기 (0) | 2021.06.26 |
| [언리얼 C++] Pawn 커스터마이즈 (0) | 2021.06.24 |
| [언리얼 C++] 블루프린트 펑션 라이브러리 (0) | 2021.06.23 |
| [언리얼 C++] Asset 레지스트리 (0) | 2021.06.20 |